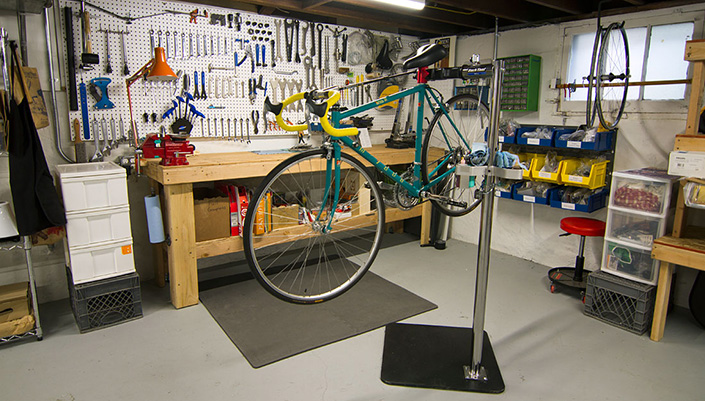
Setting up your own home bike workshop and learning to do maintenance on your bicycle is a great way to save time and money. You'll have the tools and the skills to perform common and relatively simple services and repairs. Thanks to the internet, learning bicycle maintenance skills is easier than ever. Helpful articles, video tutorials, and DIY walkthroughs are easily found on the web from sources like bicycle publications, bike shops, and professional bike technicians, and technical service manuals are often provided on manufacturers' websites.
Here's how to get started on your own home workshop.
Make a workspace
Finding a space in your basement or garage to dedicate an organized 'shop' space will make servicing your bikes easier and more efficient. Having an organized space will also save you time when searching for your favorite allen wrench that you swore you left right here last night... If you haven't made this mistake already, taking apart your dirty bike on the coffee table will be a decision you will immediately regret, so do yourself a favor and make some proper space.
Having a good workbench set up with enough space to keep your tools separated and enough storage to keep your parts sorted is super important when working on your bike at home. A simple bench made from 2x4s and plywood gives you a great work station to get started and can be assembled inside of a couple hours. I highly advise you to anchor your workbench to the wall; a wobbly bench will surely spill all your coffee, beer, lubes, and more beer. Use pressed pegboard on the wall behind your work bench to keep your most commonly used tools in an easy to reach spot to promote efficiency.
For a more advanced or expert shop, add a bench-top vise; it helps with a variety of service tasks, from pressing bearings and bushings to just acting as a third hand - handy on almost any job. Another expert add is a compressor to fill tires. A compressor will save time and is a must when setting up tubeless tires.
Watch the guys over at Mighty Car Mod build a budget workbench that's so easy, anyone could build it:
Basic services to learn
I scrolled through the curriculum for the PTFD Bike Coaches program here in Canada; knowledge of these basic repairs is required to be a certified bike coach. While the same knowledge isn't required of riders, it's easy to see from their common need why you should learn them yourself.
The following list is what I would recommend learning and getting comfortable using the tools for:
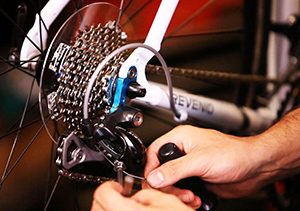
- Front and rear tire punctures - repair and replace
- Split and re-join a chain
- Tighten loose pedals/cranks/bolts
- Adjust brake lever position (including lever reach)
- Adjust saddle height and fore-aft position
- Straighten and align brake calipers
- Adjust a loose headset
- Replace brake pads
- Set up sag and rebound on air shocks and forks
Again, YouTube, bike publications/websites, and manufacturers' websites are all excellent resources when learning how to perform mechanical skills and maintenance. I recommend a full read through/watch of any tutorial or manual for the repair you are about to perform, before getting started, to make sure you understand the whole job and have all the tools required.
There are many services like suspension work, frame alignments, and dropper post work, that are best left to the pros at your local bike shop. Why? Because there they have the unique, more expensive tools needed, and/or they're authorized/certified to perform the work under terms of a manufacturer's warranty. You don't want to forfeit your warranty, and most companies in the bicycle industry have great warranty programs (which is a little surprising considering how abusive trails can be on these machines).
NOTE:
I can tell you from personal experience that when you start learning basic bike repairs and when you have the shop set up, you will have more friends - friends that need their bikes fixed. You might end up fixing bikes more than riding them.
Tools to get you started
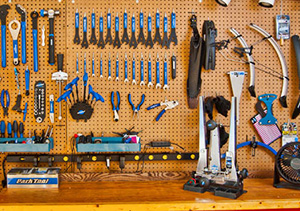
image: allseasonscyclist.com
It's worth investing a little more when you buy your tools. A quality set of tools will last longer and work better. Cheaper tools will have a shorter life and their tolerances may be looser, which can lead to unwanted wearing/stripping of bolts. Some of my longest lasting tools have been in service for almost 15 years. I use them quite frequently and they last because they are built with precision and quality materials.
A starter tool kit is a quick and easy way to get most of the tools you'll need. Most starter tool kits come in a carrying case or tool box, but if you buy tools separately or continue the growth of your tool collection, a larger tool box might be in order.
For the most basic starter kit to get your home bike shop started I recommend the Park Tool SK-2 ($111 USD). With it you will have almost everything you need for the basics: 1.5-10mm hex wrenches, cone wrenches, cassette lockring remover, chain whip, screwdriver, three-way spoke wrench, tire levers, patch kit, and a chain breaker tool - almost everything you need for home and trailside repairs. Add a nice floor pump, a good quality crescent wrench, and a high pressure shock pump, and you are well on your way.
There are options with more bike tools that you may not need right off the hop, but will be nice to have later on. The Park Tool AK-40 is what I started my personal bike shop with years ago. It has recently been updated as the comparable AK-2.
I had the luxury of stealing a bunch of tools from my dad's old automotive tool collection to complete my assortment: sockets, wrenches, and sharp picks can be very useful and found relatively cheap. If you've done any tinkering on your car or home in the past, you may already have these to start.
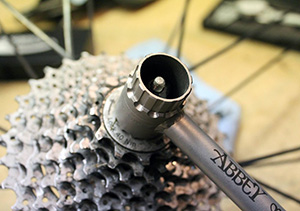
image: abbeybiketools.com
There are plenty of tools that you can choose from, limited only by your specific needs, budget, and style. Some people prefer the flexibility of portable tools they can take with them on the trails, while others like to have designated shop tools that never leave the house. Either way, the selection of quality tools is growing. Abbey Tools, in particular, have been designing top quality tools that are taking over my shop. The Crombie tool is a dual-purpose cassette tool that with a head choice for removing Campy or Shimano lock-rings. Abbey Tools also produce a suspension specific socket set with shallow walls to give good bite and lessen the chance of slipping and disfiguring the top caps. Tool finish and feel are important to me, and opposite of bike parts, heavy usually means quality and performance. I am a bike mechanic that nerds out over these sort of tools.
Bike Stand
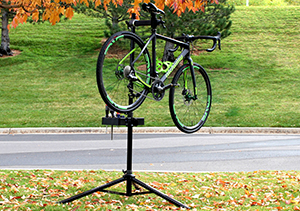
image: feedbacksports.com
After your arsenal of tools is assembled, figure out a way to secure your bike to work on it. You really should buy a bike stand, but if you need a budget option, there's this: mount three hooks to the ceiling and use them and rope to suspend the bike; rope each of the handlebar ends and the saddle. There are other DIY repair stand options out there, but I find this one works best and is the least expensive. This rope stand is cheap and useful in a pinch, but can get very aggravating with the bike rocking around with no counter weight when tuning or torquing.
I much prefer to use a Park Tools high end bike stand with an adjustable clamp in my shop. A high quality stand has a good chance of lasting longer and working better than any bike you own. Park Tool and Feedback have some of the best offerings for repair stands. The Park PCS 10 ($150USD) and the Feedback Sport Mechanic Repair Stand ($135) are best sellers. I find the PCS 10 works with every bike, while the Feedback is a more suitable for lighter bikes or road bikes. Portable and adjustable height stand options are also available, or if you wish to only purchase the clamp, Park Tool makes a wall mount that can be installed in a more permanent position (just make sure you hit the stud and anchor with lag bolts - your first repair will be a disaster, otherwise).
Bike service and repair is not overly technical, and with the right tools and resources you can decide how much time you would like to designate to any given service. It is recommended that you check all your bolts on your bike for tightness regardless of who works on your bike to confidently and safely enjoy your next ride.
RELATED ARTICLE:
Cleaning and lubricating your MTB fork
Your suspension fork is an integral piece of your bike and you should be cleaning and lubricating it regularly BikeRoar show you how to clean and lube your suspension... READ MORE
RELATED ARTICLE:
How to clean your bike post mud ride!
IWent for a ride and got your bike proper dirty? you're going to want to clean it asap BikeRoar helps you clean your bike after a muddy... READ MORE


